
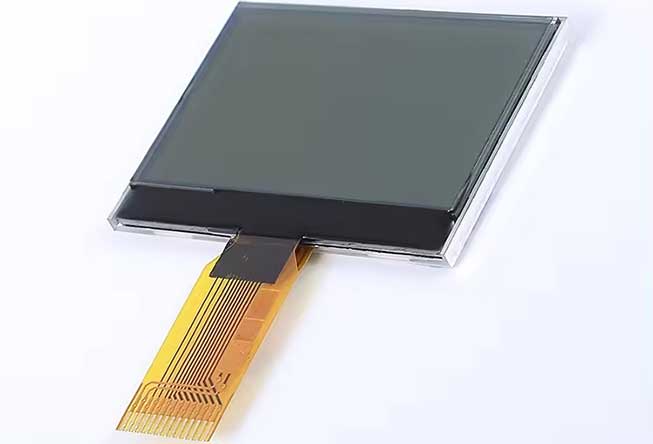
An LCD display module is a device that can display or visualize characters in real time. It can mount on a PCB such as a flexible PCB as the screen PCBA (printed circuit board assembly) in many devices. In this blog, we plan to discuss what an LCD display module is, how it works, how to integrate an LCD display with your projects, and so on. Let's get started.
What is LCD
LCD is short for Liquid Crystal Display. It can visualize your project data using Microcontroller output signals.
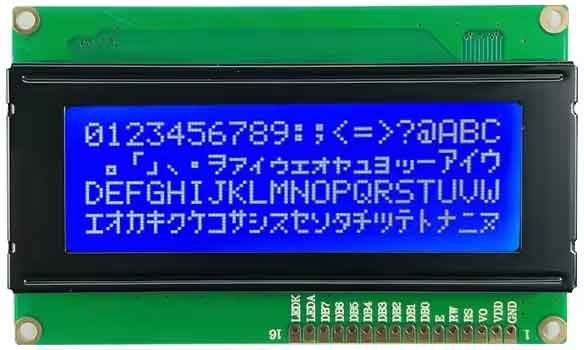
In Arduino projects, normally we use 2 common types of LCD display modules. Those are called 16x2 LCD display module and 20x4 LCD display module. In these modules, 16 or 20 means the number of characters in a single line of the display. 2 or 4 means the number of character lines in the display. Let me explain this to you. Check the below attached image.
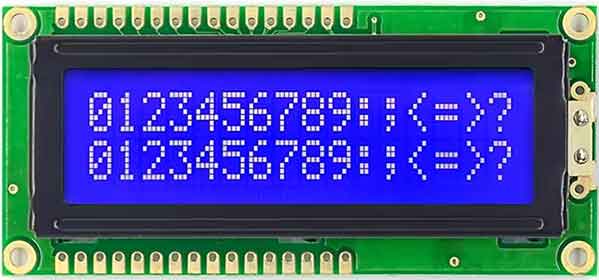
In the above image, you can see there are 2 character lines, and each line can display 16 characters. So, it is a 16x2 LCD display. Check the attached image as well. You will be able to identify a 20x4 display.
Now we know LCD 16x2 display and 20x4 display modules. Are there only these two sizes available?
No! There are several sizes available in the market. But in this blog, we are focusing on only one display type. Even though there are different sizes available in the market, all LCD displays work under the same principles.
Let's understand the theory behind the LCD Display Module.
As the name suggests, these displays use liquid crystals to visualize the required characters. Apart from circuit parts and pins, these LCD display modules contain 2 major parts.
1. LCD Panel
2. Backlight
The LCD Panel is used to visualize the required character. The Backlight is placed behind the LCD panel. Now, let's see how this display shows us a character. We use a 20x4 LCD display for this example.
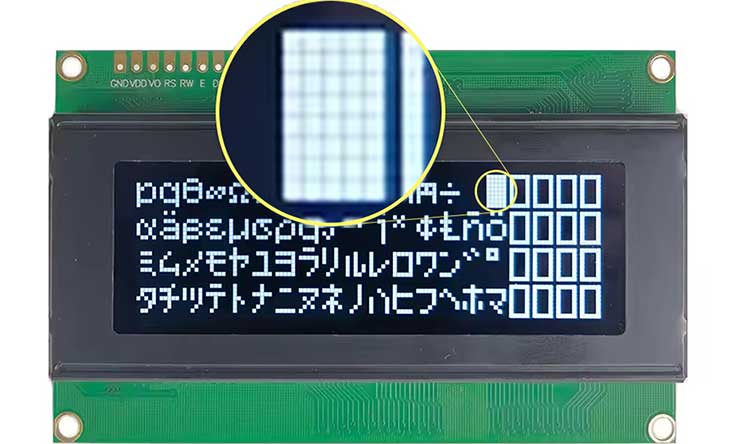
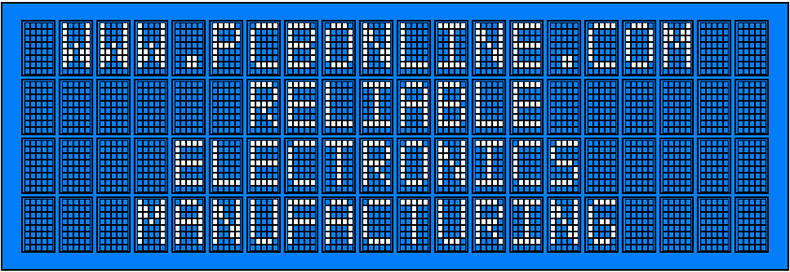
As you can see in the above image, each character is made with a 5x8 pixel grid. When it's required to visualize a character, it sends a digital signal to the LCD display to block unnecessary pixels of the grid.
In simple words, the LCD panel blocks the light coming from the back panel. It only allows the light of the required character shape to come through. Other pixels are blocked.
Let me explain further using some images.
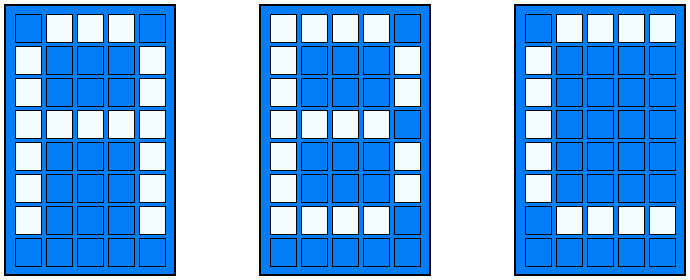
In the above image, you can see how to display some letters on an LCD display. This way, the LCD panel blocks unnecessary areas of the pixel grid and allows only the areas that are required in the character.
Major parts of an LCD display and their uses
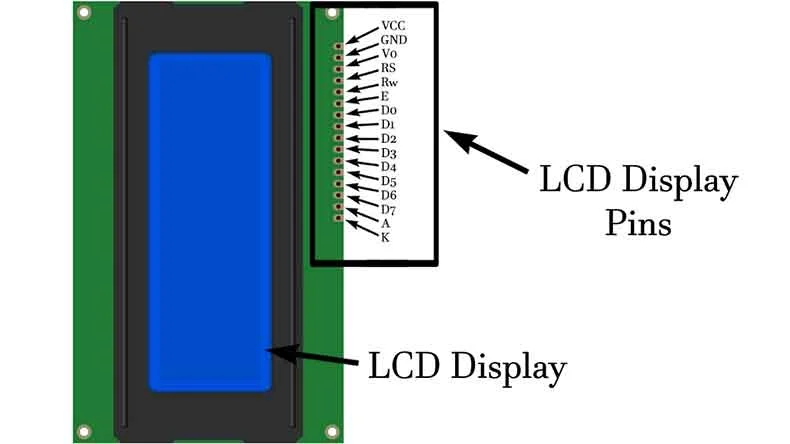
- LCD Display: As discussed earlier, this is the major component of the LCD display.
- LCD display pins: These pins are used to give an input signal to the LCD display module, which is coming from an Arduino board or any other Microcontroller. By using these pins, display light contrast also can be controlled.
- VCC Pin – Power supply for LCD(5V)
- GND – Power supply ground for LCD
- V0 – Display contrast. It can be given 0-5V using a potentiometer. 5V for the highest contrast
- Rs - Register select pin
- Rw – Read/Write pin
- E – Display enable pin
- D0 – D7 – Data transferring pins
- A – Anode pin. Same as VCC pin.
- K – Kathode pin. Same as GND pin.
How to Connect an LCD display with an Arduino board
Using a diagram, let's see how to connect this LCD display with an Arduino board. Please note that we can use any Arduino board for this. But in this example, we have used the Arduino Uno board.
Required items:
1. Arduino Uno
2. LCD display module
3. Jumper wires
4. Computer with Arduino Software installed
Now, let's connect these items according to the diagram below. Please note that some pins are not needed at this moment.
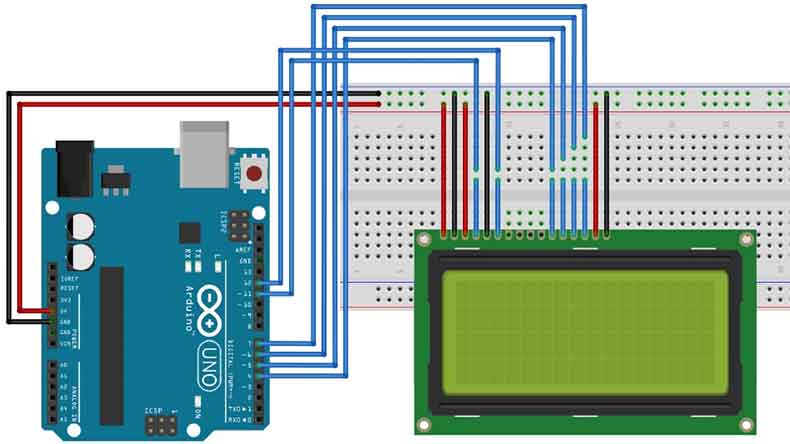
Connected Pins:
|
No
|
Connection
|
Quantity
|
|
1
|
LCD VCC
|
5V
|
|
2
|
LCD GND
|
GND
|
|
3
|
LCD V0
|
5V
|
|
4
|
LCD Rs
|
D11
|
|
5
|
LCD Rw
|
GND
|
|
6
|
LCD E
|
D12
|
|
7
|
LCD D4
|
D4
|
|
8
|
LCD D5
|
D5
|
|
9
|
LCD D6
|
D6
|
|
10
|
LCD D7
|
D7
|
|
11
|
LCD A
|
5V
|
|
12
|
LCD K
|
GND
|
PS: It's not bad. But what if you want to make it a printed circuit board assembly (PCBA) without fitting wire bundles or soldering a bunch of wires?
Talk with PCBONLINE from the online chat window. We will create any PCB and complete PCB assembly according to your requirements. No more soldering wires to LCD or bulky wire issues. This will save your soldering time, reduce errors, improve efficiency, improve stability, save space, and much more.
Sample Arduino code
Now let's check our example using a sample Arduino code given below. For this, first you will have to install the LCD display library called "LiquidCrystal". To install this library, after opening the Arduino IDE, follow the instructions given below.
1. Go to Sketch > Include Library > Manage Libraries
2. In the Library Manager, type "LiquidCrystal" and search
3. Click on "LiquidCrystal" by Arduino library and then click "Install"
Now you are ready to go. Let's check this LCD display using a simple Arduino code.
Arduino Code:
#include
// Initialize the library by associating any needed LCD interface pin
// with the arduino pin number it is connected to.
const int rs = 11, en = 12, d4 = 4, d5 = 5, d6 = 6, d7 = 7;
LiquidCrystal lcd(rs, en, d4, d5, d6, d7);
void setup() {
// set up the LCD's number of columns and rows:
lcd.begin(20, 4);
// Move the cursor to the beginning of the second line
lcd.setCursor(4, 0);
// Print a message to the LCD.
lcd.print("Hello World");
// Move the cursor to the beginning of the second line
lcd.setCursor(0, 2);
// Print a message to the LCD.
lcd.print("We are PCBONLINE.COM");
}
void loop() {
// Nothing here in the loop for this example
}
Next, upload the code to the Arduino board using the Arduino IDE.
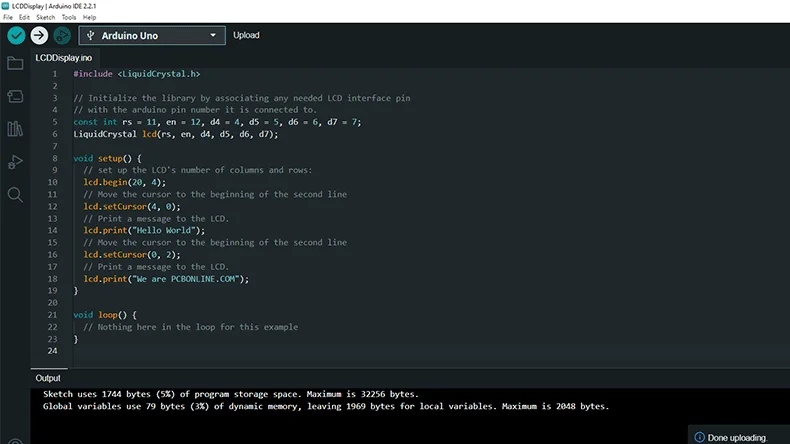
Now, you can see the text we typed on the LCD display.
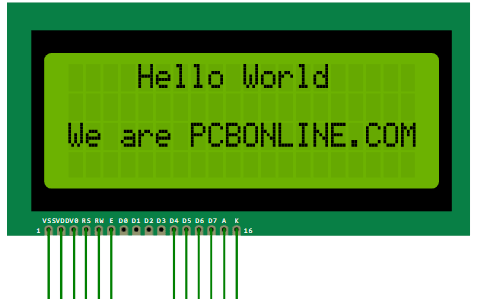
Furthermore, let's discuss the code above and what it means. So you can develop your own codes to see how it works.
lcd.begin(20, 4);
This means the number of characters per row and the number of rows in the display. So if you use a 16x2 LCD display, then you can change this to " lcd.begin(16, 2); ".
lcd.setCursor(4, 0);
This is how you tell the display, which point you are going to set the cursor for the following text. The first number is which column you are placing the cursor. The second number is which row you are placing the cursor. As per this example, we are placing the cursor on the 5th column of the 1st row.
Please note that numbering starts from "0". Let's say you want to set the cursor on the 1st column 2nd row. Then the code looks like " lcd.setCursor(0, 1); ".
lcd.print("Hello World");
This is how you can insert the text into the position we set previously.
PS: If you want to change the position of new text, you always need to set the cursor to the required position. If not, it will start printing from the previous text, the last character position onwards.
Key points to remember
- Always remember to use the appropriate voltage levels to avoid damaging the LCD display module or Arduino.
- Always double-check your wiring to ensure it matches the module's specifications.
- Always make sure to disconnect from AC power if you connect any AC-powered components to the circuit.
Applications of LCD Display Module for OEMs
By integrating custom PCBs into your applications, you benefit from enhanced performance. Custom PCBs are designed to meet the specific requirements of your project, resulting in improved performance, stability, and reliability.
Additionally, you gain space efficiency as custom PCBs are designed to fit your device perfectly, reducing space requirements and allowing for more compact designs.
Moreover, custom PCBs bond with the manufacturing process, reducing production costs and improving your product end-to-end connectivity. With fast turnaround times and efficient manufacturing processes, PCBONLINE helps you get your product to market quickly and stay ahead of the competition, thus improving your time to market.
This LCD display module is a versatile component that can be utilized in a wide range of applications across various industries and fields. It is commonly used in LED advertising screens, medical diagnostic equipment, commercial products, education projects, and customized user interfaces. This allows manufacturers to integrate custom LCD modules into their products, design their products, and manage space using a custom LCD display with flexible or other kinds of PCB. As a result, this device is very famous in most industries. Such as,
- Medical Diagnostic Equipment: LCD displays play a crucial role in the medical diagnostic equipment industry as well. It offers clear, accurate, and real-time data visualization when using LCD displays. Custom LCD modules integrated into medical diagnostic equipment enhance the quality, efficiency, reliability, and scalability of the equipment. OEMs in the medical field can contact us for LCD screen PCBA manufacturing to ensure precision and efficiency in their diagnostic devices.
- Commercial Products: For small-sized, low-budget applications such as digital meters, temperature meters, industrial controllers, and other consumer electronic items, LCDs are widely used. A huge advantage to integrating custom LCD modules into commercial products is that you have the freedom to design your product and manage space using a custom LCD display with flexible or other kinds of PCB.
- Prototype Products: Due to the easiness of visualizing data by integrating with Microcontroller code, this is widely used in prototype products. Furthermore, you can increase your prototype product quality and accelerate your product efficiency by integrating your project electronic components with custom PCBs. This enables your project rapid iteration and testing as well.
- Education Projects & Customized User Interfaces: LCD displays are widely used in education projects and customized user interfaces because they are easy to customize, allow for the creation of custom characters, and provide clear information to the user at a low cost. However, integrating a custom PCB into it reduces the complexity of wiring and increases product reliability as well.
Whether optimizing LED advertising solutions, innovating LCD-based diagnostic equipment, enhancing industrial automation, or advancing robotic systems, creating a custom PCB design ensures precision, reliability, and scalability in your projects.
One-Stop and High-Quality LCD PCBA Manufacturer PCBONLINE
PCBONLINE specializes in providing fast and high-quality PCB assembly services to your specific needs, such as LCD modules. Whether you are an OEM exploring new projects or a business maker innovating new ideas, its powerful manufacturing capabilities and professional engineers ensure seamless PCB manufacturing and assembly from prototype to bulk production.
OEMs requiring LCD screen PCB assembly for LED advertising screens, medical diagnostic equipment, commercial products, and customized user interfaces can talk with PCBONLINE from the online chat window to bring your ideas to life with precision and efficiency.
PCBONLINE is an electronics manufacturer providing source factory manufacturing. It has two large advanced PCB manufacturing bases, one EMS PCB assembly factory, stable supply chains, and an R&D team.
We have rich experience in manufacturing LCD and LED display screen PCBAs and solving technical issues, especially display flexible PCBAs.
LCD and LED screen PCBA manufacturing certified with ISO 9001:2015, IATF 16949, RoHS, REACH, UL, and IPC-A-610 Class 2/3.
We are a source factory manufacturer providing cost-effective PCB fabrication and assembly. Relying on our EMS PCB assembly factory, we can source more affordable components, including LCD and LED.
We provide one-on-one engineering support throughout your project, no matter what your custom demand is.
If you are ready to take your LCD and LED screen projects to manufacture, PCBONLINE offers fast and reliable PCB assembly services for your needs. Please don't hesitate to get in touch with PCBONLINE by email at info@pcbonline.com.
Conclusion
The LCD module is used to visualize project data in real-time. With the step by step guide provided in this article, you can set up and utilize LCD modules in your electronic projects. By implementing custom PCB developments with LCD display modules, yous can create a wide range of products, including LED advertising screens, LCD screens for diagnostic equipment, commercial displays, interactive interfaces, and much more. For the quality, efficiency, reliability, and scalability of your projects, consider PCBONLINE as your PCBA partner. Contact us today and let us provide one-stop electronics manufacturing in turning your ideas into reality with precision and efficiency.
PCB assembly at PCBONLINE.pdf


