
An Arduino Relay Module is a versatile component that allows you to control high-voltage devices using a digital signal with endless possibilities. Have you ever wondered how to control a high-voltage device using an Arduino board? You are in the right place. Let's get started.
Know about Arduino Relay Module
For this, you require an electronic component called a 'Relay Module'. This tiny device can be controlled using an Arduino board or any other microcontroller device. First of all, let's identify what a Relay Module is.

A Relay Module is an electronic switch that can be controlled by a low-voltage signal. For example, you can connect a high-voltage device such as a light bulb, water pump, fan, or any other device to an Arduino relay module and then control it using an electronic signal without using a mechanical switch.
Let's understand the theory behind the Relay Module
Apart from diodes, resistors, and transistors, the Relay module consists of a few major components, such as an electromagnetic coil and a switching mechanism. When an electric current flows through this electromagnetic coil, it generates a magnetic field around it. Then, according to that switching mechanism, the switch moves towards the electromagnetic coil. As a result, the switch can connect or disconnect the electrical connection of the relay output.
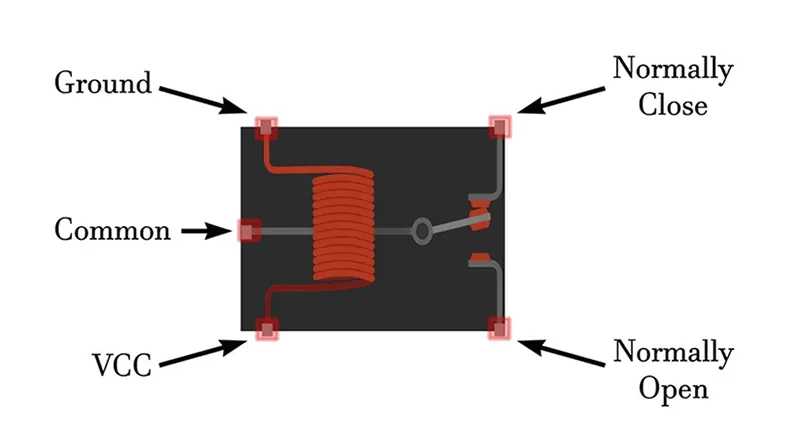
Also, there are two separate output conditions in a relay called Normally Open and Normally Closed. If we use the Common output with the Normally Open contact, then Relay output contacts are only connected once they receive an electronic signal. In Normally Close mode, Common and output contacts are connected until it receives a signal, and when it receives the signal, it disconnects the contacts. This controls the flow of electricity in the high-voltage circuit connected to the relay module.
Major parts of a relay module and their uses
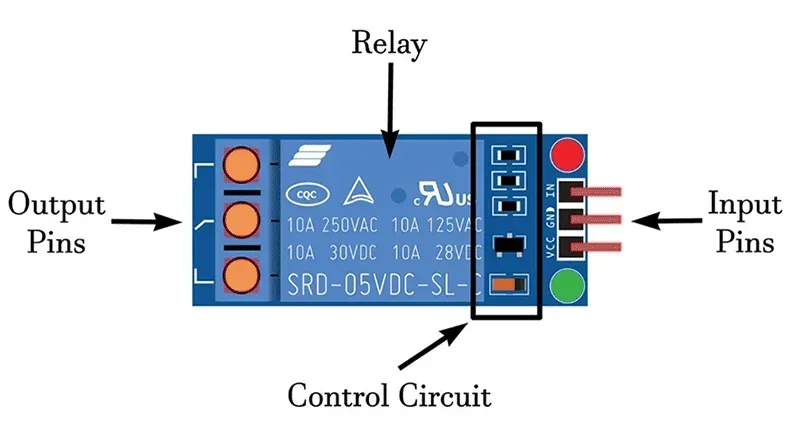
- Relay: As discussed above, it is the major component of the relay module. It consists of an electromagnetic switch inside.
- Input pins: These pins are used to give the relay module an input signal from an Arduino board or any other microcontroller.
- Output pins: These pins interact with the high-voltage device connection with the relay output. Basically, connect the wires to these pins, which need to be controlled through a switch.
- Control circuit: This includes the circuitry parts and components, such as transistors, diodes, and resistors, used to control the relay module's functions.
How to Connect a Relay Module with Arduino board
Using a diagram, let's see how to connect this relay module with an Arduino board. Please note that we can use any Arduino board for this. But in this example, we have used the Arduino Uno board.
Required items:
- Arduino Uno
- Relay module
- Light Bulb with AC power source
- Jumper wires
- Computer with Arduino Software installed
Now, let's connect these items according to the diagram below.
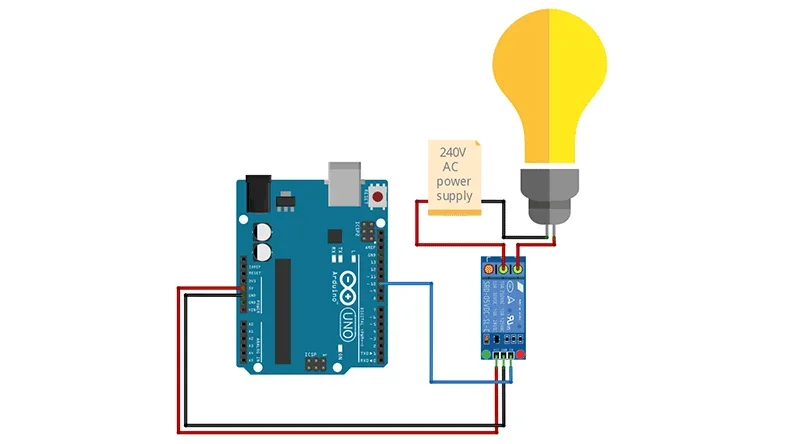
PS: Always make sure to disconnect from AC power when connecting components to the Relay.
Connected pins:
|
No.
|
Connection
|
Arduino Pin
|
|
1
|
Relay IN1
|
D10
|
|
2
|
Relay VCC
|
5V
|
|
3
|
Relay GND
|
GND
|
Sample Arduino code
Now, let's check our example using the sample Arduino code below. You can use the digitalWrite function to turn the relay on or off by setting the D10 pin to HIGH or LOW.
Arduino Code:
// Define the pin connected to the relay
const int relayPin = 10;
void setup() {
// Initialize the relay pin as an output
pinMode(relayPin, OUTPUT);
}
void loop() {
// Turn the relay on
digitalWrite(relayPin, HIGH);
// Wait for 1 minute (60 seconds)
delay(60000);
// Turn the relay off
digitalWrite(relayPin, LOW);
// Wait for 1 minute (60 seconds)
delay(60000);
}
Next, upload the code to the Arduino board using the Arduino IDE.
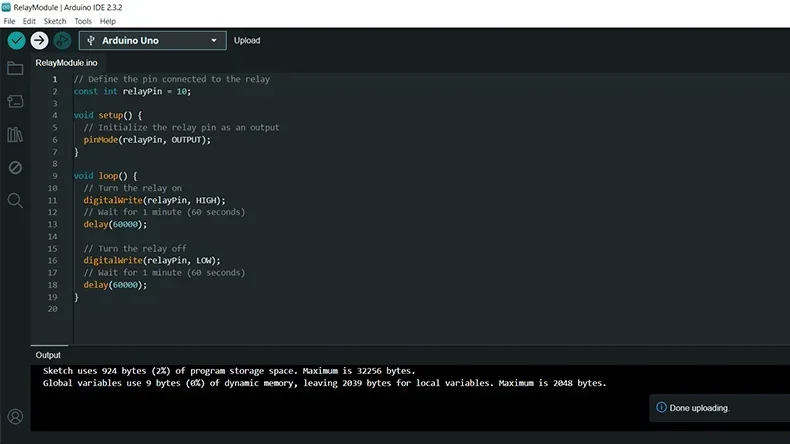
Now you can see the relay module starts to turn on for 1 minute and then off for 1 minute again.
You can make necessary changes to the code to meet various requirements. Additionally, you can upgrade this code for any project related to relay modules.
Key points to remember:
- Always remember to use the appropriate voltage levels to avoid damaging the relay or Arduino.
- Always double-check your wiring to ensure it matches the module's specifications.
- Always make sure to disconnect from AC power when connecting components to the Relay.
Applications of Arduino Relay Module
This Arduino relay module can be used in many practical applications and scenarios in day-to-day life. Using a simple example, let's see how we can modify the above system to use in a practical scenario.
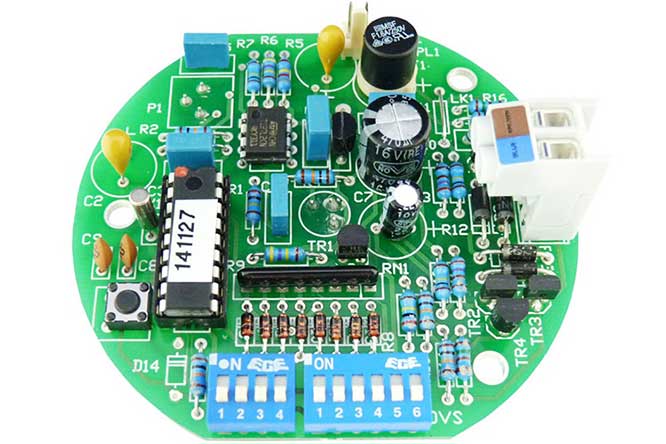
Here, we are going to see how we can control an AC light bulb and a fan using a mobile phone over the internet. For this, we are going to create a simple PCB.
Here, we have used a WiFi-enabled board called ESP8266, facilitating internet connectivity for control through a mobile phone. Apart from that, all other components remain the same as in the previous example we discussed. However, through the development of a custom PCB, we have achieved plug-and-play functionality for these components, eliminating the need for wiring or the use of jumper wires between these boards and the relay.
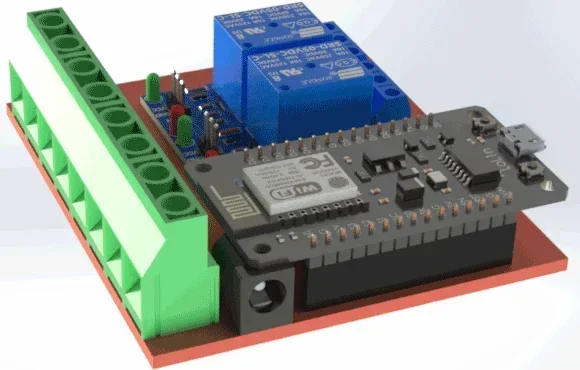
As in our previous example, this one also can be done using breadboards, wires, etc. But in practical applications, we always need to think about safety and quality. Therefore, it's better to create a printed circuit board (PCB) and assemble components on it. Integrating these relay modules into a custom PCB design ensures the reliability and ability to maintain the precision of layout, optimizing space and enhancing electrical performance. Additionally, creating a PCB board offers scalability, reproducibility, and professional features as well.
Arduino Relay Circuit Board Manufacturer and Assembler
PCBONLINE specializes in providing fast and high quality Arduino relay PCB assembly services to your specific needs. Whether you are an original equipment manufacturer exploring new projects or a business maker innovating new ideas, its powerful manufacturing capabilities and professional engineers ensure seamless PCB manufacturing and assembly from prototype to bulk production. Talk with PCBONLINE from the online chat window to bring your ideas to life with precision and efficiency.
PCBONLINE has two large advanced PCB manufacturing bases and one PCB assembly factory to custom meet your electronics manufacturing demands.
As a source factory manufacturer, we provide affordable and transparent-price Arduino relay PCBAs and electronics manufacturing.
You can have Arduino relay module PCBAs manufactured under one roof, including component sourcing, PCB fabrication, PCB assembly, IC programming, conformal coating, enclosures, and box-build assembly.
Our engineers have an average of more than 20 years of experience in engineering and can provide technical support to optimize your PCB design.
High-quality PCB fabrication and assembly certified with ISO 9001:2015, IATF 16949, RoHS, REACH, UL, and IPC-A-610 Class 2/3.
Besides one-stop electronics manufacturing, if you need R&D for your Arduino relay PCBA project, PCBONLINE can also design the PCB and enclosure for the final product.
Besides Arduino relay PCBs for switch control and automation, you can extend your cooperation with PCBONLINE to various domains, whether it's optimizing IoT home automation solutions, innovating Arduino-based projects, enhancing industrial automation, advancing robotic systems, etc. To get in touch with PCBONLINE, don't hesitate to email info@pcbonline.com.
Conclusion
Through this article, we learned the fundamentals of relay modules by exploring their workings and practical applications. Furthermore, we learned the theory behind relay modules and the key points of offering safety, versatility, and ease of control in electronic projects. Moreover, with a simple Arduino code, we have demonstrated how to toggle a relay on and off in a continuous loop, showcasing the practical implementation of relay modules for time-based control tasks.
As you advance into your electronic projects, consider Arduino relay PCBs. By integrating the functionality of relay modules into a custom PCB design, you can ensure precision, reliability, and scalability in your projects. If you are ready to take your projects to manufacture, PCBONLINE offers fast and reliable PCB assembly services for your needs. Let PCBONLINE help you turn your ideas into reality.
PCB assembly at PCBONLINE.pdf


