
ESP32 is a powerful and cost-effective SoC (system-on-chip) or module and can be used for IoT home automation devices. This blog shows a Wi-Fi project using ESP32, an IoT LED strip. Whether you are a business maker, LED light company, or electronics hobbyist, you will find a WiFi-enabled LED strip useful and perhaps want to develop an IoT LED strip or device under your brand through PCB assembly services.
Coupled with the strength of the Microcontroller ESP32 and the creativity of addressable LEDs such as WS2811, we have the perfect way of creating dazzling lighting effects controlled over the web.
Understanding WS2811 LED and ESP32
Before introducing the IoT LED strip project, we should discuss its key components, WS2811 LED and ESP32.
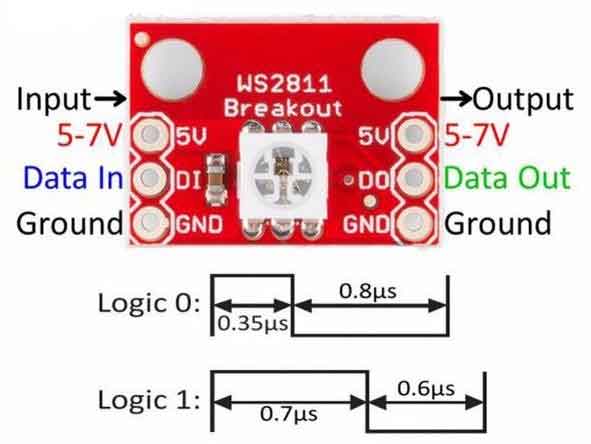
WS2811 LED: It is an integrated LED driver chip that allows the individual LEDs to be controlled independently in a chain-like structure. These LEDs are known as NeoPixels. Each WS2811 LED contains red, green, and blue (RGB) elements, which help in the production of a wide range of colors. We can also control the multiple LEDs via a single data line. The feature of WS2811 LEDs, which is a daisy chain capability, helps in this.
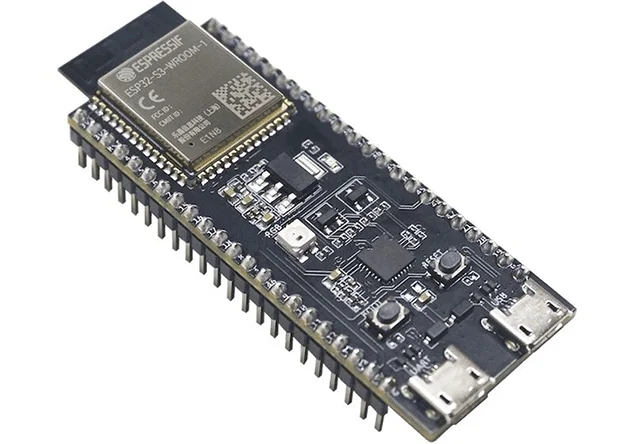
ESP32 Microcontroller: The ESP32 is a powerful and low-energy-consuming Microcontroller for IoT and embedded projects. Because it has Bluetooth and Wi-Fi built-in, it's perfect for projects that need wireless connections. With its dual-core CPU, generous memory, and extensive peripheral suite, the ESP32 is incredibly versatile and capable of a wide range of IoT uses.
LED Strip with ESP32 Project Overview
This project will use the ESP32 Microcontroller and the WS2811 LED strip to construct a web-controlled LED lighting system. We'll set the ESP32 in the Access Point mode, which would allow it to act as a standalone hotspot. By adding a web server to the ESP32, we can serve a web page that lets users manage the LED strip's color, brightness, and power state from any device with a web browser.
Materials Needed
You'll need the following materials to get started:
Required items:
- WS2811 (NeoPixel) LED strip
- ESP32 development board
- Jumper wires
- USB cable for programming and power
- Arduino IDE installed on a computer
Step-by-step guide of the ESP32 LED Strip Project
Step 1: Hardware Setup
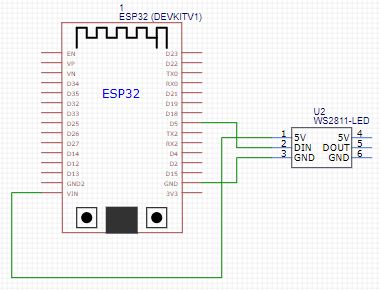
First, link the ESP32 and NeoPixel LED strips together. Connect pin 5 of the ESP32 to the data pin of the LED strip. Make sure the ESP32 is powered on and set up to function as an access point.
Step 2: Programming the ESP32
Set up the ESP32 to function as a web server by using the Arduino IDE to construct a webpage that controls the LED strip. Add the required libraries, like the WiFi and Adafruit NeoPixel libraries. Create code to manage the webpage's HTTP requests and update the LED strip appropriately.
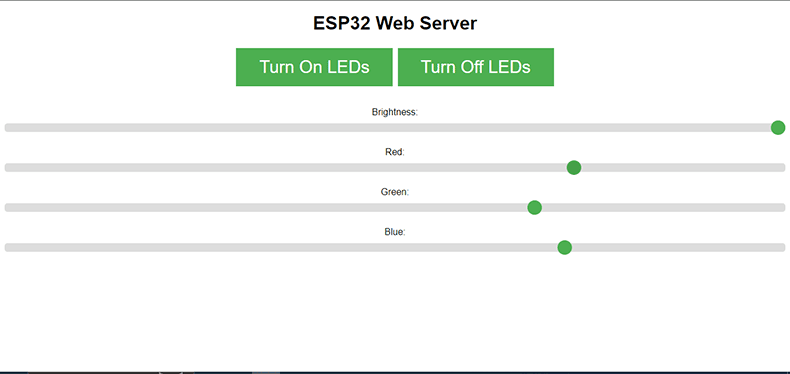
Step 3: Designing the Web Interface
To control the LED strip, create a basic HTML, CSS, and JavaScript web interface. Add sliders to change the color and brightness of the LEDs, buttons to turn them on and off, and JavaScript functions to send HTTP requests to the ESP32 when the user interacts with the controls.
Step 4: Project Finalization.
After ensuring that everything is functioning as planned, install the LED strip in the intended area and secure the components in an appropriate enclosure to complete the project.
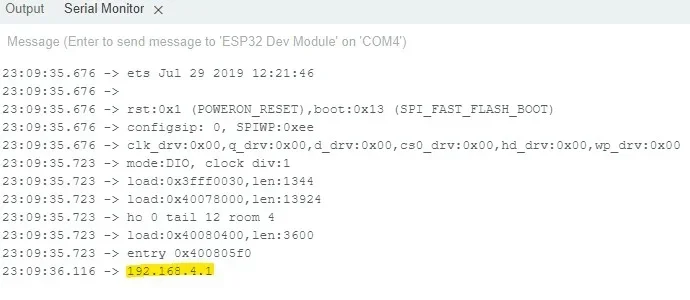
You now have a fully functional web-controlled LED strip that can be operated from any Wi-Fi-enabled device. It functions independently as an Access Point and may be connected directly. Next, link your ESP32 to your computer, upload the code, and output the IP address of the ESP32 on a serial monitor. You can then use this address to browse your webpage and manage your LEDs.
Creating a WiFi-enabled web-controlled LED strip that combines hardware and software abilities using an ESP32 in access point mode is a rewarding project. You can not only learn a lot about web server programming, LED lighting effects, and the Internet of Things with it, but you can also further develop it by integrating more components and functionalities and making it an automation device under your brand for business.
With just a few lines of code, you can unleash your imagination and create amazing visual displays thanks to the limitless customization options. Try it out and use vibrant LEDs that you can control with your fingertips to light up your surroundings.
Code:
#include <Adafruit_NeoPixel.h>
#ifdef AVR
#include <avr/power.h> #endif
#define PIN 13
// Parameter 1 = number of pixels in strip
// Parameter 2 = Arduino pin number (most are valid)
// Parameter 3 = pixel type flags, add together as needed:
// |
NEO_KHZ800 |
800 KHz bitstream (most NeoPixel products w/WS2812 LEDs) |
||||
// |
NEO_KHZ400 |
400 KHz (classic 'v1' (not v2) FLORA pixels, WS2811 drivers) |
||||
// |
NEO_GRB |
Pixels |
are |
wired |
for |
GRB bitstream (most NeoPixel products) |
// |
NEO_RGB |
Pixels |
are |
wired |
for |
RGB bitstream (v1 FLORA pixels, not v2) |
// |
NEO_RGBW |
Pixels |
are |
wired |
for |
RGBW bitstream (NeoPixel RGBW products) |
Adafruit_NeoPixel strip = Adafruit_NeoPixel(5, PIN, NEO_GRB + NEO_KHZ800);
// IMPORTANT: To reduce NeoPixel burnout risk, add 1000 uF capacitor across
// pixel power leads, add 300 - 500 Ohm resistor on first pixel's data input
// and minimize distance between Arduino and first pixel. Avoid connecting
// on a live circuit...if you must, connect GND first.
void setup() {
// This is for Trinket 5V 16MHz, you can remove these three lines if you are not using a Trinket
#if defined ( AVR_ATtiny85 )
if (F_CPU == 16000000) clock_prescale_set(clock_div_1); #endif
// End of trinket special code
strip.begin(); strip.setBrightness(50);
strip.show(); // Initialize all pixels to 'off'
}
void loop() {
// Some example procedures showing how to display to the pixels: colorWipe(strip.Color(255, 0, 0), 50); // Red
colorWipe(strip.Color(0, 255, 0), 50); // Green
colorWipe(strip.Color(0, 0, 255), 50); // Blue
//colorWipe(strip.Color(0, 0, 0, 255), 50); // White RGBW
// Send a theater pixel chase in... theaterChase(strip.Color(127, 127, 127), 50); // White
theaterChase(strip.Color(127, 0, 0), 50); // Red
theaterChase(strip.Color(0, 0, 127), 50); // Blue
rainbow(20); rainbowCycle(20); theaterChaseRainbow(50);
}
// Fill the dots one after the other with a color void colorWipe(uint32_t c, uint8_t wait) {
for(uint16_t i=0; i<strip.numPixels(); i++) { strip.setPixelColor(i, c);
strip.show(); delay(wait);
}
}
void rainbow(uint8_t wait) { uint16_t i, j;
for(j=0; j<256; j++) {
for(i=0; i<strip.numPixels(); i++) { strip.setPixelColor(i, Wheel((i+j) & 255));
}
strip.show(); delay(wait);
}
}
// Slightly different, this makes the rainbow equally distributed throughout void rainbowCycle(uint8_t wait) {
uint16_t i, j;
for(j=0; j<256*5; j++) { // 5 cycles of all colors on wheel for(i=0; i< strip.numPixels(); i++) {
strip.setPixelColor(i, Wheel(((i * 256 / strip.numPixels()) + j) & 255));
}
strip.show(); delay(wait);
}
}
//Theatre-style crawling lights.
void theaterChase(uint32_t c, uint8_t wait) {
for (int j=0; j<10; j++) { //do 10 cycles of chasing for (int q=0; q < 3; q++) {
for (uint16_t i=0; i < strip.numPixels(); i=i+3) { strip.setPixelColor(i+q, c); //turn every third pixel on
}
strip.show(); delay(wait);
for (uint16_t i=0; i < strip.numPixels(); i=i+3) { strip.setPixelColor(i+q, 0); //turn every third pixel off
}}}}
//Theatre-style crawling lights with rainbow effect void theaterChaseRainbow(uint8_t wait) {
for (int j=0; j < 256; j++) { // cycle all 256 colors in the wheel for (int q=0; q < 3; q++) {
for (uint16_t i=0; i < strip.numPixels(); i=i+3) { strip.setPixelColor(i+q, Wheel( (i+j) % 255));//turn every third
pixel on
}
strip.show(); delay(wait);
for (uint16_t i=0; i < strip.numPixels(); i=i+3) { strip.setPixelColor(i+q, 0); //turn every third pixel off
}}}}
// Input a value 0 to 255 to get a color value.
// The colours are a transition r - g - b - back to r. uint32_t Wheel(byte WheelPos) {
WheelPos = 255 - WheelPos; if(WheelPos < 85) {
return strip.Color(255 - WheelPos * 3, 0, WheelPos * 3);
}
if(WheelPos < 170) { WheelPos -= 85;
return strip.Color(0, WheelPos * 3, 255 - WheelPos * 3);
}
WheelPos -= 170;
return strip.Color(WheelPos * 3, 255 - WheelPos * 3, 0);
}
PCBA and Box build Assembly for IoT LED Strips
To turn the ESP32-based LED strip project into real devices, you'll need to design the PCB (printed circuit board) properly, send the PCB design file Gerber and bill of materials (BOM) to a PCB manufacturer and assembler to fabricate the PCBA (printed circuit board assembly). To make the final product, you'll also need to design the enclosure according to the PCBA. The one-stop PCBA manufacturer can also provide the enclosures and final product box build assembly.

PCBONLINE is an EMS (electronics manufacturing service) manufacturer that provides turnaround PCB fabrication, component sourcing, PCB assembly, IC programming, enclosures, and box-build assembly. Founded in 1999, it has two large advanced PCB manufacturing bases, one PCB assembly factory, stable supply chains, and an R&D team.
PCBONLINE has strong electronics manufacturing capabilities to meet the requirements of ESP32-based LED strips and any IoT devices.
As a PCBA source factory manufacturer, we provide cost-effective PCB boards and assemblies. As Espressif's strategic partner, we provide affordable ESP SoC/modules.
Relying on its EMS PCBA factory, PCBONLINE sources components from original factories and first-class suppliers that are traceable and reliable. The enclosure factory it works with is one of the top three in China.
The engineers at PCBONLINE have an average of more than 20 years of R&D and engineering experience and can provide PCB and enclosure designs that match the requirements of IoT devices.
From prototypes and small-batch production to bulk PCBA box-build assembly, ESP32-based LED strips and IoT devices can be manufactured under one roof and with a fast turnaround.
If you need software and hardware R&D in addition to electronics manufacturing, PCBONLINE can also develop the entire IoT project and provide original development manufacturing (ODM).
Traceable and high-quality PCB manufacturing and assembly certified with ISO 9001:2015, IATF 16949, RoHS, REACH, UL, and IPC-A-610 Class 2/3.
An ESP PCBA Example
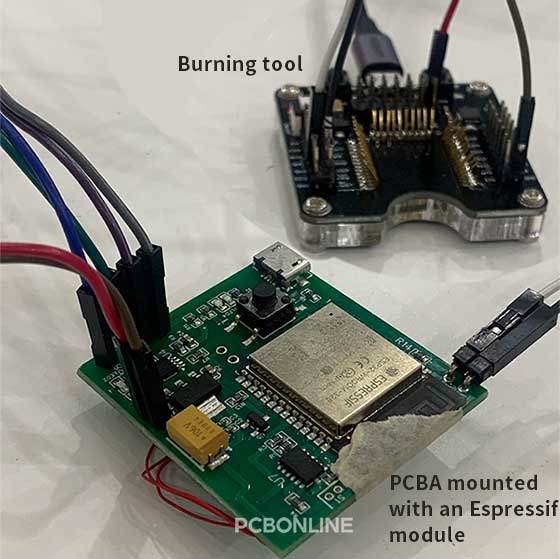
It is an ESP PCBA manufactured by PCBONLINE for intelligent sensor products. During the IC programming or burning process, we encountered a problem with an insufficient power supply. The ESPRESSIF module is the component for burning.
Initially, we suspected either a voltage or software issue, but after having an online meeting with our clients' engineering team, it was clear that it was not the case.
The issue with the power supply voltage was resolved, yet the "SYNC" error message (indicating insufficient power to burn) still appears. What could be the cause of this persisting problem?
Our engineer, Mr Ho, spent two hours constantly testing and troubleshooting and finally focused on the burning tool while maintaining the short circuit between the two pins. The key was on "Cold Boot"!
Yes, in the case of direct access, you need to manually remove the GND connection port again and install the connection twice. Then, the burning program can run successfully!
Does the ESP PCBA example ensure your confidence with PCBONLINE? Whether you need PCBs, PCBAs, components, or final product box-build assembly, you can work with PCBONLINE and enjoy one-on-one engineering support and customer services. To get a quote for your custom demands, don't hesitate to email PCBONLINE at info@pcbonline.com.
Conclusion
In the domain of smart electronics and home automation, the mesmerizing glow of LED strips controlled by the web is charming. This article shows the overview, step-by-step guide, and codes of an ESP32-based LED strip project that both engineers and students can use. To turn your IoT ideas into real devices, please work with a reliable one-stop EMS manufacturer, PCBONLINE.
PCB assembly at PCBONLINE.pdf


